|
 Re: The Gold Digger
[Re: Anthony Hiscock]
#364003
Re: The Gold Digger
[Re: Anthony Hiscock]
#364003
October 25, 2011 05:51 pm UTC
October 25, 2011 05:51 pm UTC
|
Joined: Sep 2009
Posts: 63
Hamilton
Jeff White

Regular Member
|
Regular Member
Joined: Sep 2009
Posts: 63
Hamilton
|
hey anthony
If you would like I have a brand new Jay Racing -16an waterpump block off plate installed but never used. I would be willing to part with, PM me for details.
Jeff
91 mirage 4G63T swap
Mike k's personal Bitch!
|
|
|
Re: The Gold Digger
[Re: Anthony Hiscock]
#364025
October 25, 2011 11:32 pm UTC
October 25, 2011 11:32 pm UTC
|
Joined: Jul 2003
Posts: 3,065
Colborne
Adam Grenon
Insane Member
|
Insane Member
Joined: Jul 2003
Posts: 3,065
Colborne
|
Whats the major advantage to this type of pump?
2012 - Lancer Ralliart Octane Blue
1991 - Talon Tsi AWD FP HTA 71
1992 - Talon Tsi AWD on hold
|
|
|
Re: The Gold Digger
[Re: Anthony Hiscock]
#364127
October 27, 2011 05:52 am UTC
October 27, 2011 05:52 am UTC
|
Joined: Aug 2007
Posts: 4,796
Oshawa, Ontario, Canada
Brandon Clement
Senior Member, with Far TOO Much Time on Their Hands
|
Senior Member, with Far TOO Much Time on Their Hands

Joined: Aug 2007
Posts: 4,796
Oshawa, Ontario, Canada
|
There is a waterpump block off plate Rob
No more Jetta!
Tattoo Artist at Lost Anchor
|
|
|
Re: The Gold Digger
[Re: Anthony Hiscock]
#366273
December 12, 2011 03:24 am UTC
December 12, 2011 03:24 am UTC
|
Joined: Feb 2004
Posts: 2,642
Paradise, NL
Anthony Hiscock
OP
Insane Member
|
OP
Insane Member
Joined: Feb 2004
Posts: 2,642
Paradise, NL
|
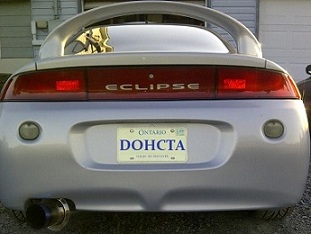
Here's some updates on some recent projects. I bought a Carbon Fiber overlay kit on eBay to wrap a couple things. First I did my center gauge pod since it's nice and flat, still needs more resin and sanding. ![[Linked Image]](http://img.photobucket.com/albums/v87/G2Rac/96%20Talon%20TSI%20AWD/Carbon%20Fiber%20Wrapping/IMGP2714.jpg) Second is I did my door boxes, they came out alright but there are raised up in a couple areas so I need to get some new ones and redo them. ![[Linked Image]](http://img.photobucket.com/albums/v87/G2Rac/96%20Talon%20TSI%20AWD/Carbon%20Fiber%20Wrapping/IMGP2715.jpg) I was out at my parents last weekend to pick up my DD. I wanted to get some work done but by the time I got there it was dark and by the time I woke up on Sunday I had a couple hours before I had to go to work. I did get more of the sound deadening mat pulled off the fire wall though. I need to get the actual tar off and I'm not sure how to do that without dry ice. I hooked up the soda blaster and cleaned out the paint on the bottom of my tail light center section, this is in preparation for my LED tail light conversion. I still need to take off the old Nite Shades on it. ![[Linked Image]](http://img.photobucket.com/albums/v87/G2Rac/96%20Talon%20TSI%20AWD/LED%20Tails/IMGP2723.jpg) I also mocked up where I want the Cannon plug to come through for the engine harness. Hopefully I can start on this over the Christmas break. Pull the heater core if I have to, drill the fire wall and start shortening the harness. The location may change from this but it will be in that general area, nice and hidden from view. ![[Linked Image]](http://img.photobucket.com/albums/v87/G2Rac/96%20Talon%20TSI%20AWD/Wire%20Tuck/IMGP2721.jpg) ![[Linked Image]](http://img.photobucket.com/albums/v87/G2Rac/96%20Talon%20TSI%20AWD/Wire%20Tuck/IMGP2722.jpg) I also test fitted my EHPS ECU and driver under the panel that all the ABS stuff goes, located in the passenger foot well. It will all fit here and I'll have to run 3 wires out to the pump; power, ground and sensor. Nothing is mounted in this picture but I'm gonna work on that this week. ![[Linked Image]](http://img.photobucket.com/albums/v87/G2Rac/96%20Talon%20TSI%20AWD/EHPS%20Conversion/IMGP2719.jpg) ![[Linked Image]](http://img.photobucket.com/albums/v87/G2Rac/96%20Talon%20TSI%20AWD/EHPS%20Conversion/IMGP2720.jpg) Last update for now, I started working on my gauge cluster bezel for the S2000 cluster. I picked up a glue gun and cheap t-shirt at Micheal's. I then cut the shirt and glued it to the bezel. ![[Linked Image]](http://img.photobucket.com/albums/v87/G2Rac/96%20Talon%20TSI%20AWD/S2000%20Cluster/IMGP2716.jpg) ![[Linked Image]](http://img.photobucket.com/albums/v87/G2Rac/96%20Talon%20TSI%20AWD/S2000%20Cluster/IMGP2717.jpg) I traced the outline of the S2000 cluster on to the shirt and then I coated the shirt with fiberglass resin. ![[Linked Image]](http://img.photobucket.com/albums/v87/G2Rac/96%20Talon%20TSI%20AWD/S2000%20Cluster/IMGP2724.jpg) Once it was hard I cut it out. That's when I decided to do something else. I've fallen out of love with my A pillar pod. I feel it's kind of a younger/boy racer mod, draws attention and is a bit of a blind spot. So I decided to make some gauge pods in the bezel. Little bit of 2" ABS pipe, some Popsicle sticks and hot glue and they wire mocked up. I need to start laying some fiberglass now. My boost gauge and wideband will live here, the AEM Volt and Prosport gauge are for mock up. [img] http://img.photobucket.com/albums/v87/G2Rac/96%20Talon%20TSI%20AWD/S2000%20Cluster/IMGP2726.jpg[/img] [img] http://img.photobucket.com/albums/v87/G2Rac/96%20Talon%20TSI%20AWD/S2000%20Cluster/IMGP2727.jpg[/img] [img] http://img.photobucket.com/albums/v87/G2Rac/96%20Talon%20TSI%20AWD/S2000%20Cluster/IMGP2728.jpg[/img] [img] http://img.photobucket.com/albums/v87/G2Rac/96%20Talon%20TSI%20AWD/S2000%20Cluster/IMGP2729.jpg[/img] [img] http://img.photobucket.com/albums/v87/G2Rac/96%20Talon%20TSI%20AWD/S2000%20Cluster/IMGP2730.jpg[/img] I bought another chassis harness so I can extend all the wires that I will be extending with the correct colors. Hopefully it will be here before Christmas. Next things to order are more wiring stuff (Deutsch shells and pins, braided sleeve, heat shrink, Mil-Spec ETFE wire in various gauges, through panel battery cable connectors, etc). Hopefully I can get the bulk of the chassis harness done over my Christmas break from school and then it's just a matter of wrapping it up with the braided sleeve. I also threw my old cheapie Chinese branded soldering iron into the garbage and replaced it with a Weller WP35 Soldering Iron ( http://www.cooperhandtools.com/brands/cf_files/model_detail.cfm?upc=037103593610). This will now become my field iron for working in driveway, garage or just quick jobs. After Christmas I'm picking up a Weller WESD51 which will be used for circuit work. Till next time!
Last edited by Anthony Hiscock; December 12, 2011 03:26 am UTC.
96 Talon TSI AWD - The Gold Digger/Never Ending Build
|
|
|
Re: The Gold Digger
[Re: Anthony Hiscock]
#366294
December 12, 2011 03:51 pm UTC
December 12, 2011 03:51 pm UTC
|
Joined: Oct 2010
Posts: 9,968
Caledon, Ontario, Canada
Bryan Lawrence
Senior Member, with Far TOO Much Time on Their Hands
|
Senior Member, with Far TOO Much Time on Their Hands
Joined: Oct 2010
Posts: 9,968
Caledon, Ontario, Canada
|
Really enjoy seeing these updates Anthony, Very impressed with all your work!
"Old Blue" 91 Talon TSi AWD
"Super Enthusiast" 91 Talon TSi AWD
Checkout DSMFAQ.com!
|
|
|
Re: The Gold Digger
[Re: Anthony Hiscock]
#366301
December 12, 2011 04:15 pm UTC
December 12, 2011 04:15 pm UTC
|
Joined: Nov 2009
Posts: 2,940
Toronto, Ontario, Canada
Michael Lee
Insane Member
|
Insane Member
Joined: Nov 2009
Posts: 2,940
Toronto, Ontario, Canada
|
We should start calling Anthony, "Mr. Custom". Hrmm, business venture anyone? 
1997 Eclipse GST/X
Eat in small amounts. Otherwise be prepared to paint toilet bowls~ Mike Eng
|
|
|
Re: The Gold Digger
[Re: Anthony Hiscock]
#370401
March 05, 2012 03:31 am UTC
March 05, 2012 03:31 am UTC
|
Joined: Feb 2004
Posts: 2,642
Paradise, NL
Anthony Hiscock
OP
Insane Member
|
OP
Insane Member
Joined: Feb 2004
Posts: 2,642
Paradise, NL
|
Been a long time since I've done anything with the harness on the car. I've been putting a lot of work into the LED conversions lately. However, the car can't drive without a harness so I need to get back to working on that this week along with the lighting stuff. I've lacked real motivation for doing stuff with the harness and I think part of that relates directly to my work space being a COMPLETE mess. Every time I walk in their my heart sinks a bit and I just lose any motivation for working on the car. Today I decided enough was enough and cleaned the damn place up, so much better now! I actually like walking into the work shop again! The mess I was dealing with. ![[Linked Image]](http://img.photobucket.com/albums/v87/G2Rac/IMGP2876.jpg) After some cleaning (I need more storage room haha). ![[Linked Image]](http://img.photobucket.com/albums/v87/G2Rac/IMGP2879.jpg) I also took some scrap ABS pipe I had laying around, cut it in half and screwed it to my work bench. Now I've got some where to keep my heat shrink, especially the dual wall stuff since you can't fold it. ![[Linked Image]](http://img.photobucket.com/albums/v87/G2Rac/IMGP2880.jpg) Did a tiny bit of work on the tuck though. I know I want my fuse box where the passenger air bag was. The bit of plastic in there makes for a problem though because it won't let the fuse box sit low enough for the cover to go back on. ![[Linked Image]](http://img.photobucket.com/albums/v87/G2Rac/96%20Talon%20TSI%20AWD/Wire%20Tuck/IMGP2873.jpg) After a minute with the Dremel. ![[Linked Image]](http://img.photobucket.com/albums/v87/G2Rac/96%20Talon%20TSI%20AWD/Wire%20Tuck/IMGP2874.jpg) Fuse box fits in perfect now, all I have to do is mount it up. ![[Linked Image]](http://img.photobucket.com/albums/v87/G2Rac/96%20Talon%20TSI%20AWD/Wire%20Tuck/IMGP2875.jpg) I will get more work done this week!
96 Talon TSI AWD - The Gold Digger/Never Ending Build
|
|
|
Re: The Gold Digger
[Re: Anthony Hiscock]
#372703
April 03, 2012 08:25 pm UTC
April 03, 2012 08:25 pm UTC
|
Joined: May 2009
Posts: 154
Canada, Ontario, Mississauga
Jay Saul
Regular Member
|
Regular Member
Joined: May 2009
Posts: 154
Canada, Ontario, Mississauga
|
Anthony, I tip my hat to you sir! ive been reading your progress and watching the pictures. Insane the amount of time and effort you used to take your car this far. I cant wait to see the 100% finished product buddy !
Cheers
2004 Nissan 350Z
|
|
|
Re: The Gold Digger
[Re: Anthony Hiscock]
#378598
July 02, 2012 12:21 am UTC
July 02, 2012 12:21 am UTC
|
Joined: Feb 2004
Posts: 2,642
Paradise, NL
Anthony Hiscock
OP
Insane Member
|
OP
Insane Member
Joined: Feb 2004
Posts: 2,642
Paradise, NL
|
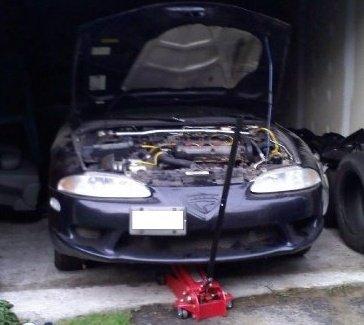
Time to blow the dust off this thread. Started actually laying out the engine harness in the car this weekend. First I put the car up on jack stands, pulled the fenders and hood. ![[Linked Image]](http://img.photobucket.com/albums/v87/G2Rac/96%20Talon%20TSI%20AWD/Wire%20Tuck/IMG_0213.jpg) Pulled the stock IM. Since I'm going with an SMIM; I need to move my coil pack. Put it in the vise for 2 seconds and bam it's relocated! ![[Linked Image]](http://img.photobucket.com/albums/v87/G2Rac/96%20Talon%20TSI%20AWD/Wire%20Tuck/IMG_0214.jpg) I pulled the OEM power steering out and put the fittings in for the AN lines that will feed the MR2 EHPS pump. ![[Linked Image]](http://img.photobucket.com/albums/v87/G2Rac/96%20Talon%20TSI%20AWD/Wire%20Tuck/IMG_0215.jpg) After buggering around with it for what seemed like hours, I got the Cannon plug installed. ![[Linked Image]](http://img.photobucket.com/albums/v87/G2Rac/96%20Talon%20TSI%20AWD/Wire%20Tuck/IMG_0216.jpg) ![[Linked Image]](http://img.photobucket.com/albums/v87/G2Rac/96%20Talon%20TSI%20AWD/Wire%20Tuck/IMG_0217.jpg) I then bolted up the JMF SMIM in and started running the engine harness. Hard to see in the first picture but the fuel injector harness is installed. You can see it better in the second picture. ![[Linked Image]](http://img.photobucket.com/albums/v87/G2Rac/96%20Talon%20TSI%20AWD/Wire%20Tuck/IMG_0218.jpg) ![[Linked Image]](http://img.photobucket.com/albums/v87/G2Rac/96%20Talon%20TSI%20AWD/Wire%20Tuck/IMG_0219.jpg) Here's the harness so far with only the injectors wired in. ![[Linked Image]](http://img.photobucket.com/albums/v87/G2Rac/96%20Talon%20TSI%20AWD/Wire%20Tuck/IMG_0220.jpg) I then went ahead and installed the Speed Density sensors. I'm going to shorten these a bit more; they're a bit longer then I wanted. ![[Linked Image]](http://img.photobucket.com/albums/v87/G2Rac/96%20Talon%20TSI%20AWD/Wire%20Tuck/IMG_0221.jpg) Then I put the Coolant sensor for the ECU and the Coolant Gauge. I will run this under the hoses when I install it. ![[Linked Image]](http://img.photobucket.com/albums/v87/G2Rac/96%20Talon%20TSI%20AWD/Wire%20Tuck/IMG_0222.jpg) Here's the harness as it sits now. Injectors, Speed density, coolant sensor and gauge, coil, noise capacitor, Cam Position Sensor, Crank Position Sensor and VSS. [img] http://img.photobucket.com/albums/v87/G2Rac/96%20Talon%20TSI%20AWD/Wire%20Tuck/IMG_0223.jpg[/img] That's all I got done this weekend, not as much as I wanted but I was also helping my Dad with things around there house so that took some time too. Next time I go out I will get the engine harness done and then get the dash harness done. I'm happy with how the harness is coming out so far; I've shorterned it a nice bit. Hopefully I will get out there again in another few weeks!
96 Talon TSI AWD - The Gold Digger/Never Ending Build
|
|
|
Re: The Gold Digger
[Re: Anthony Hiscock]
#387489
October 25, 2012 01:08 am UTC
October 25, 2012 01:08 am UTC
|
Joined: Feb 2004
Posts: 2,642
Paradise, NL
Anthony Hiscock
OP
Insane Member
|
OP
Insane Member
Joined: Feb 2004
Posts: 2,642
Paradise, NL
|
ZOMG update time! First off do to some poor planning on my part things didn't go as....planned...Parts didn't show up on time and thus limited my ability to get as much work as I wanted done. Here's what I did get done. Engine side harness is complete minus the TPS and IAC. I'm waiting for my Q45 TB to show up and I also need to grab a Nissan Evap Purge Control Valve to mount my DSM IAC with some mods (see here: http://www.dsmtuners.com/forums/art...m-iac-any-aftermarket-throttle-body.html). ![[Linked Image]](http://img.photobucket.com/albums/v87/G2Rac/96%20Talon%20TSI%20AWD/Wire%20Tuck/100_0188.jpg) I started goint through the interior side of the engine harness to untangle things. Before actually doing any wiring I want to mount the dash, ecu, MFI, fuel pump and starter relays up before actually cutting any wires. However I forgot the brackets so I can mount everything up. At least it's untangled so I can start working with it all next time I go out. ![[Linked Image]](http://img.photobucket.com/albums/v87/G2Rac/96%20Talon%20TSI%20AWD/Wire%20Tuck/100_0189.jpg) I also made up some plates to mount my Duestch connectors in the wheel wells. ![[Linked Image]](http://img.photobucket.com/albums/v87/G2Rac/96%20Talon%20TSI%20AWD/Wire%20Tuck/100_0190.jpg) ![[Linked Image]](http://img.photobucket.com/albums/v87/G2Rac/96%20Talon%20TSI%20AWD/Wire%20Tuck/100_0192.jpg) I'll be back out to the car on the 20th to finish the wiring up. I'll have my battery then too and maybe my distrubtion block if I can figure out what I'm doing with all the battery stuff. Some good news, I turned the motor over via a socket in the crank pulley; I'm happy to say she turns over freely. Went out to the car this weekend to knock some more stuff off. Sadly I didn't get everything I wanted done but I'm getting closer! Saturday morning. I decided to start with something easy, bolting my FMIC on. Ya, not easy.....thanks to some rusty broken bolts this was a PITA!! I'm seriously considering replacing the rad support COMPLETELY on this thing right now. However, I did get it bolted on. ![[Linked Image]](http://img.photobucket.com/albums/v87/G2Rac/96%20Talon%20TSI%20AWD/Intercooler/100_0199.jpg) It was now Saturday afternoon and I was running out of steam so I opted to do a couple more easy things. Remote Jumper Terminals. ![[Linked Image]](http://img.photobucket.com/albums/v87/G2Rac/96%20Talon%20TSI%20AWD/Wire%20Tuck/100_0200.jpg) Through panel battery cable connectors in the wheel wells. Driver side has a positive and negative for the MR2 EHPS pump. ![[Linked Image]](http://img.photobucket.com/albums/v87/G2Rac/96%20Talon%20TSI%20AWD/Wire%20Tuck/100_0202.jpg) Passenger side has two positive, 1 for the distrubtion/fuse box and 1 for the starter. One hole was drilled a bit too big, oops. ![[Linked Image]](http://img.photobucket.com/albums/v87/G2Rac/96%20Talon%20TSI%20AWD/Wire%20Tuck/100_0203.jpg) Fire wall has 2 positive(only got one drilled). 1 for the starter and 1 for the alternator. ![[Linked Image]](http://img.photobucket.com/albums/v87/G2Rac/96%20Talon%20TSI%20AWD/Wire%20Tuck/100_0211.jpg) Once all this was done it was time to pack it in as I had lost day light. Sunday morning I jumped right into the interior side of the engine/ecu harness. Look as this rats nest of wiring!!! ![[Linked Image]](http://img.photobucket.com/albums/v87/G2Rac/96%20Talon%20TSI%20AWD/Wire%20Tuck/100_0204.jpg) Injector resistor box and Power Transistor's new home. I'm going to make a little aluminum panel/heat sink for them to bolt to. [img] http://img.photobucket.com/albums/v87/G2Rac/96%20Talon%20TSI%20AWD/Wire%20Tuck/100_0206.jpg[/img] Starting to look a little less messy?! [img] http://img.photobucket.com/albums/v87/G2Rac/96%20Talon%20TSI%20AWD/Wire%20Tuck/100_0208.jpg[/img] I started routing a few wires over towards the passenger side of the car (wipers, BCS, reverse lights, etc). [img] http://img.photobucket.com/albums/v87/G2Rac/96%20Talon%20TSI%20AWD/Wire%20Tuck/100_0209.jpg[/img] When this started to happen... [img] http://img.photobucket.com/albums/v87/G2Rac/96%20Talon%20TSI%20AWD/Wire%20Tuck/100_0210.jpg[/img] FUUUUUUUUUUUUUUUUUUUUUUUUUUUUUUUUUU! Ah well I had to drive home anyhow. Tonight I did some more work on the engine/ecu harness. I started by routing wires and soldering some splices then using adhesive lined heat shrink. [img] http://img.photobucket.com/albums/v87/G2Rac/96%20Talon%20TSI%20AWD/Wire%20Tuck/100_0214.jpg[/img] Pretty much finished interior side engine/ecu harness. Still need to route a few wires and solder a couple more things but I'm almost done. [img] http://img.photobucket.com/albums/v87/G2Rac/96%20Talon%20TSI%20AWD/Wire%20Tuck/100_0215.jpg[/img] Engine side harness, done-ish. Needs a TPS pig tail soldered on, boost gauge wires added and my WBO2. [img] http://img.photobucket.com/albums/v87/G2Rac/96%20Talon%20TSI%20AWD/Wire%20Tuck/100_0216.jpg[/img] Last thing I did before leaving the car on Sunday is take some measurements for the headlights, corner lights and bumper makers. Here's that part of the harness so far (passenger side). [img] http://img.photobucket.com/albums/v87/G2Rac/96%20Talon%20TSI%20AWD/Wire%20Tuck/100_0213.jpg[/img] I'm getting close, crossing my fingers that next time I go out she will start for the first time in 2 years!
96 Talon TSI AWD - The Gold Digger/Never Ending Build
|
|
|
Re: The Gold Digger
[Re: Mike Eng]
#387524
October 25, 2012 10:12 pm UTC
October 25, 2012 10:12 pm UTC
|
Joined: Feb 2004
Posts: 2,642
Paradise, NL
Anthony Hiscock
OP
Insane Member
|
OP
Insane Member
Joined: Feb 2004
Posts: 2,642
Paradise, NL
|
Has it been that long!? Whoa. It's run but not really lol. Sadly I will pull it all apart again to get some things coated. holy cow man! that's coming together nicely!  question: what bracket is that holding your coil pack? Modified stock bracket. I'll try to remember to get a picture of it. I'd like to go COP but I won't unless I find a screaming deal on an Ignition box.
96 Talon TSI AWD - The Gold Digger/Never Ending Build
|
|
|
Re: The Gold Digger
[Re: Anthony Hiscock]
#391359
December 31, 2012 06:51 pm UTC
December 31, 2012 06:51 pm UTC
|
Joined: Feb 2004
Posts: 2,642
Paradise, NL
Anthony Hiscock
OP
Insane Member
|
OP
Insane Member
Joined: Feb 2004
Posts: 2,642
Paradise, NL
|
Bit more work done lately. I started by bundling the S2000 cluster electronics up and terminating them to one 12 pin DT series plug. ![[Linked Image]](http://img.photobucket.com/albums/v87/G2Rac/96%20Talon%20TSI%20AWD/S2000%20Cluster/IMG_0343_zps8b88d1f0.jpg) The Modifry chip and Speedohealer can be removed from this harness. The 12V to 5V convertor and Autometer Tach Adapter cannot. The small harness is for a NO switch which operates the top speed recall feature in the Speedohealer. ![[Linked Image]](http://img.photobucket.com/albums/v87/G2Rac/96%20Talon%20TSI%20AWD/S2000%20Cluster/IMG_0341_zps86103747.jpg) Another overall shot, everything is covered in Braided Sleeve with adhesive lined heat shrink terminating the ends. ![[Linked Image]](http://img.photobucket.com/albums/v87/G2Rac/96%20Talon%20TSI%20AWD/S2000%20Cluster/IMG_0342_zps7e81aa44.jpg) I then moved on to the Fuse box. I add wiring for relays and fuses to run some of the Aux. systems (Gauges, S2000 cluster electronics, etc). The wiring. ![[Linked Image]](http://img.photobucket.com/albums/v87/G2Rac/96%20Talon%20TSI%20AWD/Wire%20Tuck/IMG_0331_zps9e04d6ac.jpg) 6 Pin DT Series connector, it needs a plug because there are only 5 wires. ![[Linked Image]](http://img.photobucket.com/albums/v87/G2Rac/96%20Talon%20TSI%20AWD/Wire%20Tuck/IMG_0332_zps7dab11ca.jpg) 3 relays will be switch on when the ignition is on to power the Aux. systems. ![[Linked Image]](http://img.photobucket.com/albums/v87/G2Rac/96%20Talon%20TSI%20AWD/Wire%20Tuck/IMG_0333_zpsb748cfee.jpg) I also mounted some switches in the center console. The first push button momentry switch operates the bi-xenon stutter shutter. Then there's 2 switches with covers, these will be for Water and Meth injection when I add them. Both those systems will be plug and play when added because I'm doing all the wiring now. There's the AEM Volts gauge too but that's been there for a while. ![[Linked Image]](http://img.photobucket.com/albums/v87/G2Rac/96%20Talon%20TSI%20AWD/Wire%20Tuck/IMG_0337_zpsc46ab7b0.jpg) In the center console storage compartment I mounted 2 switches; 1 is for the top speed recall on the Speedohealer and the 2nd controls the Demon eye LEDs in my retro. ![[Linked Image]](http://img.photobucket.com/albums/v87/G2Rac/96%20Talon%20TSI%20AWD/Wire%20Tuck/IMG_0335_zps45a55803.jpg) Also, the most important thing, I got myself a Dry Erase board to keep track of what I'm working on. ![[Linked Image]](http://img.photobucket.com/albums/v87/G2Rac/96%20Talon%20TSI%20AWD/Wire%20Tuck/IMG_0338_zpscc172d99.jpg)
96 Talon TSI AWD - The Gold Digger/Never Ending Build
|
|
|
Re: The Gold Digger
[Re: Anthony Hiscock]
#391360
December 31, 2012 06:57 pm UTC
December 31, 2012 06:57 pm UTC
|
Joined: Oct 2010
Posts: 9,968
Caledon, Ontario, Canada
Bryan Lawrence
Senior Member, with Far TOO Much Time on Their Hands
|
Senior Member, with Far TOO Much Time on Their Hands
Joined: Oct 2010
Posts: 9,968
Caledon, Ontario, Canada
|
Anthony, super impressive! I look forward to your updates as the amount of electronics scares me in my own car. I think I may start doing some wiring too!
"Old Blue" 91 Talon TSi AWD
"Super Enthusiast" 91 Talon TSi AWD
Checkout DSMFAQ.com!
|
|
|
Re: The Gold Digger
[Re: Anthony Hiscock]
#403240
May 20, 2013 05:06 am UTC
May 20, 2013 05:06 am UTC
|
Joined: Feb 2004
Posts: 2,642
Paradise, NL
Anthony Hiscock
OP
Insane Member
|
OP
Insane Member
Joined: Feb 2004
Posts: 2,642
Paradise, NL
|
I've been slowly working on this and over the past few weeks I've been kicking myself in the ass to get it finished so I can get the car started and running. Before doing anymore work though I needed to address a couple things in the work shop. My work bench top was made from two pieces of tongue and groove plywood, while this worked I was always loosing things in the gap plus it had seen better days. ![[Linked Image]](http://img.photobucket.com/albums/v87/G2Rac/96%20Talon%20TSI%20AWD/Wire%20Tuck/100_0280_zps61bb7f78.jpg) I replaced it with a single piece of 1/2" thick plywood that I clear coated to seal it. ![[Linked Image]](http://img.photobucket.com/albums/v87/G2Rac/96%20Talon%20TSI%20AWD/Wire%20Tuck/100_0281_zps6c3118d2.jpg) I put some hooks up to have some where to hang my harnesses up. I'm sick of the frigging things getting tangled up because I was throwing them into boxes. ![[Linked Image]](http://img.photobucket.com/albums/v87/G2Rac/96%20Talon%20TSI%20AWD/Wire%20Tuck/100_0335_zps914094ea.jpg) I also invested in some peg board to organize things a bit better. I still really really need (plus want) a nice tool box but this will do for now. ![[Linked Image]](http://img.photobucket.com/albums/v87/G2Rac/96%20Talon%20TSI%20AWD/Wire%20Tuck/100_0336_zps89893916.jpg) I tackled getting the Q45 TB ready for the car. I'm keeping all idle controls, FIAV and ISC, so thanks to Paul Volk's write up, I grabbed a Nissan EGR valve from eBay and have a remote mount ISC now. ![[Linked Image]](http://img.photobucket.com/albums/v87/G2Rac/96%20Talon%20TSI%20AWD/Engine/100_0282_zpsff4de9cb.jpg) I wanted to change the factory coolant hose bungs on it to 3/8" like the DSM uses. So I pulled/drilled the old fittings out. I did the same for the vacuum ports, except these are plugged with set screws. Old nipples out. ![[Linked Image]](http://img.photobucket.com/albums/v87/G2Rac/96%20Talon%20TSI%20AWD/Engine/100_0301_zps4b57fc77.jpg) Drilled out. ![[Linked Image]](http://img.photobucket.com/albums/v87/G2Rac/96%20Talon%20TSI%20AWD/Engine/100_0307_zps01d6f86a.jpg) I broke a drill bit off in the TB, I sh!t bricks over this but was able to get the broken pieces out. ![[Linked Image]](http://img.photobucket.com/albums/v87/G2Rac/96%20Talon%20TSI%20AWD/Engine/100_0305_zps9bae40e4.jpg) New hose barbs in and the plug in the vacuum port (lock tite to seal it). ![[Linked Image]](http://img.photobucket.com/albums/v87/G2Rac/96%20Talon%20TSI%20AWD/Engine/100_0350_zpsd777bddc.jpg) I also filled the unused connector on the TB with silicone. I didn't want the unused plug sitting there and I didn't want the connector off exposing the terminals to the elements. ![[Linked Image]](http://img.photobucket.com/albums/v87/G2Rac/96%20Talon%20TSI%20AWD/Engine/100_0351_zps66c70ed0.jpg)
Last edited by Anthony Hiscock; May 20, 2013 05:08 am UTC.
96 Talon TSI AWD - The Gold Digger/Never Ending Build
|
|
|
Re: The Gold Digger
[Re: Anthony Hiscock]
#403241
May 20, 2013 05:09 am UTC
May 20, 2013 05:09 am UTC
|
Joined: Feb 2004
Posts: 2,642
Paradise, NL
Anthony Hiscock
OP
Insane Member
|
OP
Insane Member
Joined: Feb 2004
Posts: 2,642
Paradise, NL
|
In case anyone is wondering why I'm blocking vacuum ports; well for starters, cleanliness is next to godliness, I have lots of vacuum ports on the bottom of my SMIM (had extras installed) and lastly, push connect fittings! These things are freakin sweet! ![[Linked Image]](http://img.photobucket.com/albums/v87/G2Rac/96%20Talon%20TSI%20AWD/Engine/100_0352_zps8b9ef5f2.jpg) Now we get on to what I've been screwing with for years now, that damned wiring harness. I've learned a lot from this (better planning) and now the end is in sight. However lets go and see some of the mistakes I've made. Working on the S2000 cluster swap again, the dash harness is done now minus I have to add a pot to fine tune my fuel gauge and mount up all the modules/boxes behind the cluster (nothing some Velcro can't solve. Fixing some wiring. ![[Linked Image]](http://img.photobucket.com/albums/v87/G2Rac/96%20Talon%20TSI%20AWD/Wire%20Tuck/100_0283_zps07a5cf0e.jpg) Powering the cluster with my bench supply to make sure I've got everything wired right. ![[Linked Image]](http://img.photobucket.com/albums/v87/G2Rac/96%20Talon%20TSI%20AWD/Wire%20Tuck/100_0284_zpsd7e0f029.jpg) ![[Linked Image]](http://img.photobucket.com/albums/v87/G2Rac/96%20Talon%20TSI%20AWD/Wire%20Tuck/100_0285_zpsa4f8fd62.jpg)
96 Talon TSI AWD - The Gold Digger/Never Ending Build
|
|
|
Re: The Gold Digger
[Re: Anthony Hiscock]
#403242
May 20, 2013 05:09 am UTC
May 20, 2013 05:09 am UTC
|
Joined: Feb 2004
Posts: 2,642
Paradise, NL
Anthony Hiscock
OP
Insane Member
|
OP
Insane Member
Joined: Feb 2004
Posts: 2,642
Paradise, NL
|
Once that was done I turned my attention towards the engine side wiring harness. Remember I mentioned mistakes, well here's where I made one. I had the pins and sockets on the wrong sides! ![[Linked Image]](http://img.photobucket.com/albums/v87/G2Rac/96%20Talon%20TSI%20AWD/Wire%20Tuck/100_0287_zpscba87e1f.jpg) ![[Linked Image]](http://img.photobucket.com/albums/v87/G2Rac/96%20Talon%20TSI%20AWD/Wire%20Tuck/100_0286_zpsbb151e32.jpg) I went through the harness with my meter to find shared grounds, powers, etc. I could then solder them together so only 1 wires through the cannon plug instead of several. ![[Linked Image]](http://img.photobucket.com/albums/v87/G2Rac/96%20Talon%20TSI%20AWD/Wire%20Tuck/100_0294_zpscddf8110.jpg) ![[Linked Image]](http://img.photobucket.com/albums/v87/G2Rac/96%20Talon%20TSI%20AWD/Wire%20Tuck/100_0295_zps3ee44c56.jpg) Crimping pins on and terminating the connector. ![[Linked Image]](http://img.photobucket.com/albums/v87/G2Rac/96%20Talon%20TSI%20AWD/Wire%20Tuck/100_0326_zps75e904f7.jpg) I bought a new notebook which will contain all the pin outs for all my connectors. It's very important to document this stuff! ![[Linked Image]](http://img.photobucket.com/albums/v87/G2Rac/96%20Talon%20TSI%20AWD/Wire%20Tuck/100_0327_zps15dc7371.jpg) The finished engine side ECU harness ready for test fitting in the car. ![[Linked Image]](http://img.photobucket.com/albums/v87/G2Rac/96%20Talon%20TSI%20AWD/Wire%20Tuck/100_0328_zpsc8f58907.jpg) Around this point in time I found some sweet deals on F6 braided sleeve on eBay. I bought tons of it, 20-30 ft of each (1/8" to 1.5" diameters). ![[Linked Image]](http://img.photobucket.com/albums/v87/G2Rac/96%20Talon%20TSI%20AWD/Wire%20Tuck/100_0288_zps79af61e4.jpg) Fast forward to last night, I've got some sort of stomach bug and couldn't sleep so I figured why not be productive. My fuse box is now finished. I need to heat shrink the braided sleeve on the HDP20 bundle still. ![[Linked Image]](http://img.photobucket.com/albums/v87/G2Rac/96%20Talon%20TSI%20AWD/Wire%20Tuck/100_0333_zps7efdc131.jpg) The separate connectors are labelled. Here's the ignition switch and Aux. Circuits connectors. ![[Linked Image]](http://img.photobucket.com/albums/v87/G2Rac/96%20Talon%20TSI%20AWD/Wire%20Tuck/100_0341_zps60d042ad.jpg)
Last edited by Anthony Hiscock; May 20, 2013 05:11 am UTC.
96 Talon TSI AWD - The Gold Digger/Never Ending Build
|
|
|
|
|

![[Linked Image]](http://img.photobucket.com/albums/v87/G2Rac/96%20Talon%20TSI%20AWD/Cooling%20Mods/IMGP2657.jpg)
![[Linked Image]](http://img.photobucket.com/albums/v87/G2Rac/96%20Talon%20TSI%20AWD/Cooling%20Mods/IMGP2658.jpg)
![[Linked Image]](http://img.photobucket.com/albums/v87/G2Rac/96%20Talon%20TSI%20AWD/Cooling%20Mods/IMGP2659.jpg)
![[Linked Image]](http://img.photobucket.com/albums/v87/G2Rac/96%20Talon%20TSI%20AWD/Cooling%20Mods/IMGP2660.jpg)
![[Linked Image]](http://img.photobucket.com/albums/v87/G2Rac/96%20Talon%20TSI%20AWD/Cooling%20Mods/IMGP2661.jpg)
![[Linked Image]](http://img.photobucket.com/albums/v87/G2Rac/96%20Talon%20TSI%20AWD/Wire%20Tuck/IMGP2656.jpg)
![[Linked Image]](http://img.photobucket.com/albums/v87/G2Rac/96%20Talon%20TSI%20AWD/Engine/IMGP2662.jpg)
![[Linked Image]](http://img.photobucket.com/albums/v87/G2Rac/96%20Talon%20TSI%20AWD/Wire%20Tuck/IMGP2665.jpg)
![[Linked Image]](http://img.photobucket.com/albums/v87/G2Rac/96%20Talon%20TSI%20AWD/Wire%20Tuck/IMGP2663.jpg)
![[Linked Image]](http://img.photobucket.com/albums/v87/G2Rac/96%20Talon%20TSI%20AWD/Wire%20Tuck/IMGP2664.jpg)


![[Linked Image]](http://img.photobucket.com/albums/v87/G2Rac/96%20Talon%20TSI%20AWD/Wire%20Tuck/IMGP2667.jpg)
![[Linked Image]](http://img.photobucket.com/albums/v87/G2Rac/96%20Talon%20TSI%20AWD/Wire%20Tuck/IMGP2668.jpg)
![[Linked Image]](http://img.photobucket.com/albums/v87/G2Rac/96%20Talon%20TSI%20AWD/Wire%20Tuck/IMGP2669.jpg)


![[Linked Image]](http://img.photobucket.com/albums/v87/G2Rac/96%20Talon%20TSI%20AWD/Wire%20Tuck/IMGP2954.jpg)
![[Linked Image]](http://img.photobucket.com/albums/v87/G2Rac/96%20Talon%20TSI%20AWD/Wire%20Tuck/IMGP2953.jpg)
![[Linked Image]](http://img.photobucket.com/albums/v87/G2Rac/96%20Talon%20TSI%20AWD/Wire%20Tuck/IMGP2986.jpg)