 Taken from Auto Sound & Security February 1996.
 Sound Advice - Article 4 |
If you have been keeping up with the previous articles you should either have an after market radio installed or decided that the factory radio is good enough. So what's next? Well, one of the biggest improvements to the sound you hear comes from upgraded speakers. The topic of speakers is not an easy topic to cover as there are books dedicated to the subject. In an article of this scope we can only hope to touch on some of the various details of "speakers".
The human hearing range is from 20 Hz to 20,000 Hz. "O.K...So
what does that mean?" Well, 1 Hz is one cycle per second. So, if a speaker could
produce a 1 Hz signal you would see the cone move out, back to the rest position,
continue to move back (negative direction) and once again move forward to the rest
position -all in one second. This motion of moving; first to a maximum position in
one direction, then, back through the rest position to a maximum in the opposite direction
and once again forward to the rest position, mirrors the action of a sine wave. Musical
notes are made up from sine waves which are pure tones. When these pure sine waves are
mixed with other sine waves of different frequencies and amplitudes various musical sounds
are created. This is how a synthesizer keyboard can closely approximate the sound of a
piano or violin. Any complex wave form can be made up from pure sine waves through this
combination process. For example, a square wave can be made from a fundamental frequency
sine wave and a number of subsequent harmonic sine waves each with a decreasing amplitude
and increasing frequency. Note: you would likely never want to listen to a square wave,
it's just for demonstration purposes. The higher the number of harmonic sine waves used
the closer the final wave form will look like a square wave. This series of waves is
called a Fourier series. O.K enough of the technotalk!! You are probably
asking yourself ; " What does all this have to do with speakers?" The
answer?' A speaker is a transducer. "O.K, so what's a transducer?" Transducers
convert one form of energy to another. In this case the transducer (speaker) converts
electrical energy to mechanical energy. It's the job of the speaker (transducer) to
vibrate the air and recreate the musical signal you are listening to. The musical
signal is made up from all those sine waves of different amplitudes and frequencies
mentioned earlier. Sounds easy enough right? The problem is not all speakers can do this
over the entire range of 20 Hz to 20 KHz very well. Lower frequencies need bigger surface
area speakers and higher frequencies need smaller ones. It's for that reason most
house speakers are constructed as; two way (tweeter and woofer) and three way
(tweeter, mid range and woofer). The same applies to the automotive world. So why can't a
SINGLE speaker perform over the entire range??? Speakers do exist that try to
perform this task but they fall very short on performance. Known as "full range"
speakers they are often found in very inexpensive systems. If you have ever heard the
sound from these "things" you would know what I mean! The bass is really more of
a mid range and distorted and the treble is very screechy. That's because the speaker is
trying to vibrate slowly to reproduce bass and also try to move fast to reproduce treble
and it can't do both WELL at the same time. The solution is to divide the entire audible
bandwidth up into smaller bands so that speakers of different sizes can perform better i.e
bigger speakers produce the lower frequencies and smaller speakers reproduce the higher
ones.
The traditional cone type speakers are constructed the same,
independent of their size. A woofer is big, has a large magnet and a heavy cone so
that it can vibrate large amounts of air at relatively low frequencies. A tweeter, on the
other hand, needs to move very fast to vibrate at 20K Hz therefore the cone is very light
and small and the magnet size required is much smaller.
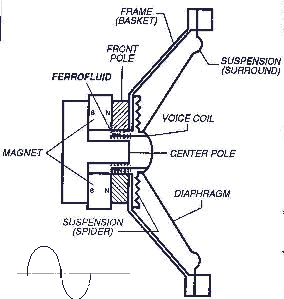
This diagram shows the basic construction of a cone type speaker.
Taken from Auto Sound & Security February 1996.
O.k Let's assume that you are playing a test disk in your car, which
can play specific frequencies, and assume it's a sine wave of 1000 Hz. See that little
squiggle that looks like an "S" on it's side in the diagram above?? That's a
sine wave....So, in our case there would be 1000 of them occurring in 1 second. The signal
is applied to the voice coil of the speaker via the speaker cable from your head
unit. The voice coil is an electromagnet which can change it's polarity depending on the
voltage polarity applied to it. One end of our voice coil will develop a north pole and
the other a south pole, depending on which half (+ or -) of the sine wave is flowing
through it at that instant in time. The poles of the electromagnet will either
attract or repel the pole of the permanent magnet. Since the voice coil is attached to the
diaphragm, via the spider suspension, it can only move forward and backwards. The amount
of movement increases as the sine wave approaches it's maximum point. It's the diaphragm
that pressurizes or depressurizes the air and causes it to vibrate at the frequency of the
applied signal. As the sine wave signal starts to decrease towards zero the voice coils
poles repel less and the diaphragm starts to move back towards the rest position. The
spider suspension helps to keep the rest position at the same point. When the sine wave
starts to go negative the electromagnet (voice coil) will reverse it's polarity so it
starts to move in the opposite direction. As such, the diaphragm moves in the opposite
direction also. The basket (frame) merely supports the whole assembly and is responsible
for preventing the diaphragm from distorting. The surround connects the diaphragm to the
basket. The ferrofluid is a special liquid that is injected into the gap between the voice
coil and permanent magnet to aid in cooling. Speakers are not very efficient (about 5%) as
a result nearly all the power applied to the speaker is turned into heat. It's the job of
the ferrofluid to conduct the heat away from the voice coil to the pole magnet where it is
dissipated. Ferrofluid is required more for small speakers, such as tweeters, because the
voice coils are made from much finer wire than say a 12" woofer with a 4" voice
coil and 10 lb pole magnet. The bump in the middle of the diaphragm is the dust cap and
helps keep dirt out of the voice coil gap. It's this part of the speaker you often see
pushed in by those people who insist on damaging display speakers in stores.
As you can see the speaker is a relatively simple idea. We have two magnets-
one being permanent and the other (the voice coil) able to reverse it's polarity. The
attraction or repulsion of the two causes the voice coil to move backwards and
forwards.The diaphragm moves in sync with the applied signal because it's attached
to the voice coil. As a result, air is pressurized or depressurized and we hear the
original signal. The remaining components (suspension, basket, surround) are there to
support the diaphragm and to centre the voice coil.
As an interesting aside- if you were to connect an oscilloscope to a
speaker and push the diaphragm in and out you would see a signal very much like a sine
wave. I.e a speaker can act like a microphone! That's it! You now know how a speaker
works!
As was mentioned earlier- no one speaker can operate
over the entire audible range with any kind of decent performance. Therefore speakers were
developed to perform very well over a portion of the audio band. Woofers/subwoofers
generally work from about 80 Hz and down, mids from 80 Hz to 2 KHz and tweeters from 2K
and up. It's not uncommon for speakers to operate in bands other than those I just
mentioned. For example, a 10" woofer may be used as a Sub woofer in one system but as
a midrange in another. Even 8" speakers can be used as sub woofers, size is not
always everything. The bigger 12"-15" speakers do not necessarily play
lower than the smaller ones but they will play louder. I had a system that used two
8" sub woofers and it played right down to 20 Hz- it just did not play very loud.
O.K, we now know that speakers of different sizes are designed to
operate in different frequency bandwidths. You may be asking yourself "How do
we split the original signal up and send it to the different speakers?" That
responsibility belongs to a device known as a crossover. Crossovers come in two flavours-
active and passive. We'll get into these in more detail in later articles but briefly;
passive crossovers are made from capacitors and coils and are installed after an
amplifier. Active crossovers are made from components like transistors and are
installed before an amplifier. In this case the amplifier is committed to operating over
the range determined by the crossover. This means more than one amplifier will be needed
to run the system. Passive and Active crossovers can be combined in a system. A popular
configuration is to use an active crossover to split the sub woofer frequencies and send
them to an amplifier. The remaining frequencies are also amplified but then further split
up, by a passive crossover after the amp and sent to the mid ranges and tweeters. This
configuration cuts down on the number of amplifiers needed. We'll talk much more about
crossovers in later articles.
Speakers can be bought in many different packaging
configurations e.g. 4x6, 6x9,5 1/4", 6 1/2" 3", plate speakers, raw
drivers. There are even speciality configurations for certain factory applications such as
Volkswagen and Mercedes. However, there are really only a few popular configurations-those
being raw drivers, coaxials and separates
Sub woofers are probably the most popular "raw" driver i.e. a
speaker sold by itself. They are generally not combined with other drivers (speakers)
because they are installed in large enclosures and don't interact well with other smaller
drivers that occupy the same air volume. Sub woofers create lots of pressure and this can
cause the diaphragm of the smaller drivers to move, independent of the signal applied to
them. This results in distortion and possible damage to the smaller driver.
Let's look at the "separates" next. Also known as component
speakers these types of speaker are individual drivers that are sold as a package
consisting of a woofer, tweeter and some form of passive crossover. The idea is to
place the woofer and tweeter in individual locations to maximize sound quality. The
woofers are usually anywhere from 4" to 6 1/2" and "most often"
mounted in the front doors and rear decks (note: there are always exceptions to the rule!
we'll look at custom installations in later articles). The tweeter is usually 3/4" to
1" in diameter and can be mounted practically anywhere. Most come with "eye ball
" mounting kits that allow you to either surface mount them or flush mount them. The
tops of the door and dash are the most common placement positions. We'll discuss placement
in more depth a little later on. The crossover has an input that connects to the radio or
amplifier and two outputs- one for the woofer and one for the tweeter. They are generally
mounted out of site .
The more expensive component speakers use higher quality crossovers and
better materials. The permanent magnets are often made from Neodymium, which is more
powerful than the standard ferro irons, allowing the magnets to be much smaller. Cheaper
sets use lower grade components in the crossovers and cheaper materials in the speaker
construction. Your front speakers are the most important ones so get the best you
can afford. You can pay anywhere from $175.00 to $800.00 for a component set. There is no
point though, in spending $300.00 for front speakers if you are using a $100.00 amp.
Your system is only as good as it's weakest component! The idea is to have a budget in
mind when planning your system. If you want to spend $1000 on the complete system then
look at spending about $250.00 for front speakers. i.e. about 1/4 of the budget.
Coaxial speakers mount both the woofer and tweeter together in one basket (frame). The traditional coaxial speaker is a 4" to 6 1/2" woofer with a tweeter mounted infront of it via a bridge or pole. Some of the better coaxial speakers come with an external crossover like the component speakers. Cheaper ones will have a very simple filter (capacitor) attached to the tweeter. So why use coaxial speakers? For one they save space and you can get very good performance if they are mounted correctly. Note the key word "correctly"! More on that in a minute...Coaxial speakers have one major flaw. Since the tweeter is mounted above the woofer slight time delay and phase distortion problems occur. This is because sound waves will trickle over the edge of the tweeter and combine with the woofers sound waves and cause constructive and destructive interference resulting in slight distortion. To eliminate this problem a different type of coaxial speaker was developed know as a "coincidental" coaxial. In this design the tweeters voice coil shares the same space as the woofers voice coil. If you were to remove the dust cap from the speaker in the diagram above and drop a tweeter into that space you will get a pretty good idea of what they look like. By having the two voice coils occupy the same space the sound will emanate from a single point known as a "point source". This synchronizes the sound waves coming from the tweeter and woofer and eliminates the distortion. Coaxial speakers were once generally regarded to be inferior to component speakers, however, with correct mounting and with a good quality speaker excellent sound can be achieved. Notice the "correct" mounting again....
Let's touch on some other speaker types for a moment before moving on. We've all heard of triaxial speakers right? These are usually 6x9 speakers with a small mid speaker and tweeter suspended above the woofer. These types of speaker are generally used in budget installations are not really considered to be audiophile grade. However, like I said earlier there are always exceptions to the rule. I use a pair of 6x9 coaxial speakers for rear fill in my installation. Since it's only "fill" and is only used for ambience I didn't see the need for expensive speakers. I would even use factory speakers for the rear fill as the volume is considerably lower than that of the front stage. I also run them in mono to cut down on any localization of the fill.
A recent trend in the car audio camp is to use horn speakers as the front drivers. A horn speaker is really called a horn loaded compression driver or HCLD for short. They are used extensively in the pro audio arena. Ever noticed the speakers at concert? The "tweeter" looks like a rectangular hole- this is infact the horn. They are built in two sections, the driver and the horn. The compression driver consists of a large magnet and a voice coil. Like the traditional speaker they are designed to vibrate, but instead of moving a diaphragm they vibrate a dome. In front of the dome is a cover called a phasing plug. High pressure sound waves are produced in the airspace between the dome and phasing plug. These then enter the narrow end of the horn and are acoustically transformed into low pressure sound waves at the wide end. The main benefit of HCLD's is their wide frequency response which cuts down on the number of speakers required to cover the audible range and also the number of crossovers needed. Since the sound exits from a wide mouth the sound is spread across a large sound stage resulting in better imaging. We'll discuss staging and imaging a little later as it's what separates a run of the mill installation to a competition worthy one. Typically in this type of installation the entire system will consist of some subs, a mid bass speaker and the HCLD's i.e very simple. HCLD's are not without their faults. They cost more than cone type speakers, they are large and require very specific mounting requirements-typicaly under the dash. Their frequency response is very peaky and requires a lot of equalization to get good sound and you need more power to run them when compared to the traditional cone speaker. If you can overcome all these deficiencies you can get exceptional performance. A large number of IASCA competitors use them and swear by them.
Let's talk about some of the qualities that make a
truly good sounding system then we can see how correct speaker placement influences these
qualities. Some of the terms you'll hear at a audio competition are, "staging"
"imaging", "depth and width" . A typical comment written on a score
sheet might read "Good front stage with rear fill. Imaging was focused with
excellent depth and width" So, what does it really mean? The idea behind a good
install is to try and reproduce the setting in which the recording was made. For example
if it's a live recording then you want the interior of your car to become the concert
hall. How often have you gone to a performance and sat with your back facing the
performer? Probably not very often! Yet people don't mind listening to their car's
stereo with the rear speakers overpowering the fronts. This is where the
"staging" comes into play. The preferred set-up is to have a front stage with
some rear fill. With this set-up the majority of the sound comes from the front- which
more accurately reproduces the true listening position. Rear fill is exactly that- it's
"fill" only. The sound you hear coming from behind you, whether it be a concert
or your house is reflected sound. Reflected sound has a degree of delay to it which
makes up the ambience most people are used to. It's actually rather unnatural not to have
any reflected sound. I remember sitting at the back of lecture halls in university where
they have sound deadening material installed. If you turned your head so one ear was
facing the Prof. and the other facing the sound deadening you would only hear the sound
with one ear. A really weird sensation!! In the car the rear speakers should be
there ONLY for the ambience. Infact, the judges will often turn their heads so one ear is
pointing towards the front and the other the rear. They then plug the ear facing the front
and only then should they hear the rear speakers. That's how low the volume should be. To
help the ambience you can run the rear speakers in mono- this cuts down on the chance that
you will be able to localize certain instruments or performers. Remember the rear speakers
are for ambience only! O.K, time to move on to "imaging"..Imagine yourself back
at the concert for a minute...It's pretty easy to associate the sound of the instrument to
the location of each performer because you can see them. If you can close your eyes and
still "see" the performer playing based only on the sound then that is good
imaging. It's fairly easy to get good imaging with a home system because of the
"sweet spot" right in the middle of the speakers. If you move closer to either
speaker you'll notice that the ability to pinpoint the performer on the stage decreases.
This is the problem with car stereos. If there was only one seat right in the middle of
the car then imaging would be good. As we know though there are very few cars with a
single seat in the middle!
The distance from the speaker to the listeners ears is called the path
length. It's difficult to get good imaging in the car because of the difference in path
length from the location of speakers mounted in the traditional locations to the listeners
ears. I.E the driver is much closer to the speaker on their side than the speaker on the
passenger side and vice versa. This causes the sound from the near speaker to arrive
before the one from the far speaker and as a result the image is pulled towards the closer
speaker. There are few thing you can do to "try" and compensate for this
problem. You can turn the balance knob to raise the volume of the far speaker. Known as
time intensity trading -it will benefit the near side listener somewhat but of course the
other listeners sound will deteriorate even more. The same problem occurs when you use a
signal processor of some kind that delays the sound of the near speaker. In each case it
causes the sound of one of the listeners to be degraded. The popular fix about seven years
ago was to use a centre channel speaker. This speaker is usually of similar quality
as the main speakers and placed in the middle of the dash. This is what I did in my car. I
mounted the speaker in a small box in the old tape unit location. The difference with and
without the speaker is really noticeable. Some degree of signal processing (deriving a L-R
signal) is usually required to really bring out the full performance of a centre channel
though. The problem with this set-up is the added complexity for the install and cost of
the required equipment.
Today's answer to the imaging problem is to either use the HCLD
speakers mentioned previously or to equalize the path length of the front speakers.
We've already talked about how the HCLD'd work and how they disperse the sound in a wider
pattern. Let's concentrate on equalizing path lengths. As was said earlier, if there was
only one seat in the middle of the car the path length from each speaker would be equal
and we would not have this problem. Since that is not an option we must move the speakers
to try and equalize the path lengths. Believe it or not the best place to mount speakers
to do this is in the kick panels, down near the floor. In later articles we'll attempt to
make our own kick panels out of fibreglass to accommodate a speaker. There are a few
companies that have made panels for just such a purpose, Q-Forms is one that comes to
mind. The speakers are generally aimed up toward the dome light so that the sound from the
speakers is more on axis than off axis. What do we mean by this? If you took a
pencil and stabbed it through the middle of the speaker that would be the axis of the
speaker. So on axis would mean the sound is coming directly at you from the front of the
speaker. Off axis means you are at some angle to the front of the speaker. Why is on axis
response important? Most speakers are designed for an onaxis response and as such the
sound will be degraded the further off axis you are. So, if you buy a set of speakers,
based on your listening to them in a store display (on axis), then install them in
the lower portion of the front door- you are listening well off axis and can expect the
sound to be somewhat degraded.
Like I said earlier,the most important speakers are
the front ones so spend as much as you can afford on them. For the Talon I would buy
some component speakers consisting of 5 1/4" midrange and 1" tweeters. Mount the
woofer in the factory door location and experiment with the tweeter location by using
double sided tape to move the tweeter around to different locations and see how you like
the sound. Try down at the kick panels and aimed at the dome light, try the tops of the
doors and other locations. You'll probably be happy and have less installation hassles if
you put them in the factory dash location. Coax speakers would also work well but you
would have to use fairly small ones and build some kick panels to get decent performance.
For rear speakers you could get away with the factory ones IF the volume is kept low in
the rear (as it should be) or, you could replace them with 6 1/2" Coax speakers.
Don't spend too much money here as the money is better used for the front speakers.
If you never intend on adding an amplifier you'll want to find the most
efficient speakers you can. Speaker efficiency is measured in decibels (db). The higher
the db the more efficient the speaker. A speaker with an 89 db rating will require twice
the power of a speaker with a 92 db rating to sound the same. Consider the speaker power
rating if you will add an amplifier at some point. The biggest factor in determining
speaker quality is your ears. Make sure you listen to the speakers before you buy
them. Take a cd you are very familiar with and listen to IT- not one provided by the sales
person. They have a habit of using some instrumental piece that is engineered with bass
and treble boost to mask speaker deficiencies. Make sure the speakers are playing on their
own and not with a sub woofer or with any equalization. You'll be able to get a better
idea of the speakers natural response that way. Move around so you can hear on axis and
off axis response and note the sound quality.
If you want deep bass then you'll need an amplifier and a couple of sub
woofers. We'll talk about amplifiers in a later article. Two 10" subs will provide
ample bass for most people but for real "bass heads" two 12" or even
15" Woofers will get the job done. Just remember, the bigger the sub the bigger
the enclosure required resulting in less storage space. A later article will be dedicated
to sub woofer enclosure choices. Buy the front speakers first then save for the subs as
they can be added at anytime.
The easiest way to install speakers is to use the factory locations.
However, this is not the always the most desirable location for sound. I moved the
tweeters from the dash to the tops of the doors to avoid the reflected sound from the
windshield. It did help cut down on the harshness but imaging suffered somewhat. Once I
added the centre channel though imaging was vastly improved. If I were to do it again
though I think I would leave the speakers in the factory locations but add the
centre channel. The centre channel in my car is located in a small box below the
radio in the space once used by the tape deck.
Kick panels would work very well but in the Talon you would have
to use a fairly small speaker, maybe 4 1/2 " or so, so that you could still use the
dead pedal.
O.K, how do we actually install the speakers? Well, if you are
using the factory locations it's not too difficult. The door speakers are 5 1/4" but
the mounting pattern is different than most after market speakers so you need to make a
simple baffle board to adapt them.
Cut some 1/2" MDF to shape using the black mounting ring, that the
factory speakers are installed in, as a template. Simply trace around the perimeter to get
the outside dimension and mark the mounting screw locations while you are at it. Now place
the speaker (cone side down) on the template and centre it. Now mark the speaker mounting
holes. You now have two choices; if the speakers came with a cardboard template you can
use it to transfer the speaker hole to the wooden baffle. If it didn't come with a
template then a little more work is required. First draw a line that connects the opposite
speaker mounting screw locations that you marked earlier. You should now have an
"X" drawn on the baffle. Now using a compass draw a circle, using the x as
the centre, of the appropriate size required to mount the speaker. Cut the hole out with a
jigsaw, mount the speaker to the baffle and voila! A custom made mounting bracket! You can
now mount the speaker easily in the door. The same technique can be used to adapt both the
rear speakers and the tweeters, except you may want to use thinner 1/4" hardboard.
You can use the factory wiring to hook the speakers up but, if you read
the article on hooking up a head unit, I recommended running new heavier gauge wire. If
you still have not done it yet then NOW is the time! You've already got the door panels
off and once you've connected up the new speakers you won't have to worry about it again.
Use 12 or 14 gauge wire to get better current flow. It's also easier to remove
rubber tube, that connects the door and car body, to run the cable through. Read the
previous article to see how to connect the speakers to the head unit..
Well, that about wraps things up! You should be on your way to some
decent sound after this upgrade!