What is an FCU? An FCU is the fluid collection
unit / flow control unit, a buffer in the clutch fluid lines, that pools fluid to smooth
out clutch pedal engagement.
Why should we remove it? In order to make sure
the clutch fully engages in performance situations.
**Do this Mod AT YOUR OWN RISK**
This will most likely totally void your powertrain warranty, if it is
noticed by the dealer. Keep all parts...
If at any time you feel uncomfortable stop and get help. I mean mental help, this is
very easy. (small joke, please do not take offence)
Removing the FCU
Locate, beg for, borrow or steal the following items:
- 10mm line wrench (must be a line wrench. Sears has them.)
- Dot 4 brake fluid (small jar is fine) this is what the clutch system uses for fluid
- 14mm boxend wrench
- Shop manual
- Long flathead screwdriver
- Pliers
- Clear plastic tubing 3/8 OD x 1/4 ID (for bleeding the air from the line afterwards)
- Catch can for the brake fluid you bleed out
- CLEAN rags (important, make sure they are clean.
- 1 or 2 friends to help bleeding the air out of the system (I did it by myself but it
took a lot longer)
- 12mm socket and ratchet
|
 |
Look at the clutch line section in the shop manual and notice where there is a FCU in
the middle of the hydraulic line. The line bends around in a circle. This is what you are
going to take out.
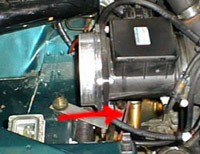
Pop your hood and get a visual on this little sucker. It will be bolted to the front
passenger side of your transaxle and have a rubber hose and a steel line going into the
top of it. These lines are just like the brake lines on your car so, once you think you
have found the FCU make sure and follow the lines down to the clutch on the bottom of the
transaxle. For those of you who have large hands like me, you might want to remove the
large air hose that goes from your MAS to the turbo (this will make the job easier but it
is not necessary). The FCU itself is about 4"-5" tall and 3" wide and is on
a bracket that is bolted to the front of the transaxle.
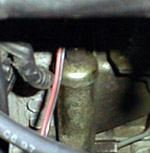 |
Get out that 10mm LINE wrench. (Do not try this with a 10mm boxend wrench as you WILL
strip the nut) Loosen the line that comes up from your clutch (not the clutch pedal,
but the clutch itself) and goes to the top of the FCU. Jack up the car (using standard
safety practices, braces, etc.) and get under it. Loosen the nut on the line that goes
into the rubber line which is mounted on the FCU bracket. |
The rubber line that goes into your FCU has a clip that holds it in place, this clip is
on the underside of the bracket. Remove this clip with the pliers and the long
screwdriver.
Completely unscrew both of the lines. Do not worry about air getting into the system,
as you will bleed that out later. Just make sure that no dirt gets in at all. One little
grit can still be dangerous to any hydraulic system.
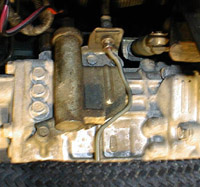
Unbolt the four 12mm bolts that hold the FCU to the transaxle, and remove the FCU. Put
this in a plastic zip-lock bag or something because it is full of brake fluid and will
make an awful mess otherwise.
| Now, the object is to connect the line that comes up from your clutch and went to the
FCU, to the rubber line that went into the FCU, just without the FCU in between. This will
take some VERY CAREFUL bending of the steel line to mate it up with the rubber line. Double
check to make sure that there is no dirt or contaminates on the flare, the flare seat, the
male threads or the female threads. Connect the two lines, using your 10mm line wrench and
the 14mm boxend wrench. Check your manual for the proper torque spec. (good 'n snug is
what I used) |
 |
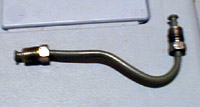
| This is the piece of steel tubing that you will have left over when you are done. |
 |
Bleeding the Clutch System
Time to get ready to bleed the system. The bleeder is on the bottom of the transaxle,
right where the line goes into the cylinder. Loosen the bleeder with your 10mm line wrench
just a bit and leave it on the bleeder. You now want to push the clear tubing on to the
bleeder and run the tubing into the catch can.The reason the tubing has to be clear is to
be able to see the fluid/air coming out when your bleeding the system.
Time to bleed the system. First thing that I did was to take a CLEAN paper towel and
carefully stuff it into the hydraulic fluid (DOT 4 brake fluid) reservoir. This is the
small reservoir about the size of a silver dollar. This is done to clean out the old and
dirty fluid.
Fill it back up. Station one of your friends at this reservoir and have them keep it
full. (Carefully! This stuff takes off paint!) Next, station one of your friends in your
driver's seat. Their job is to slowly push in the clutch. Now, your job is to turn the
bleeder after the clutch man pushes the clutch pedal to the floor. Then, tighten it back
up, and then have the clutch man pull the pedal back up. (Remember that it is the clutch
arm fork that pushes the clutch peddle back up so when you are bleeding the system, it is
normal to have to pull the pedal back up off of the floor).
At this point the refill guy should be refilling. Do this a bunch of times. You will
see a big pocket of air go through the system and after that happens you should do it a
couple more times just to make sure.
Check for leaks.
You will know your system is bled correctly when you can put the car in gear, push in
the clutch, and with the car jacked up, turn the tire by hand. If you have AWD you will,
of course have to do some additional jacking at this point. If you can not, then you need
to do some more system bleeding.
Test drive your "NEW" clutch.
I did this whole process by myself. The only difference is that it took a bit longer.
What I did to push the clutch in is I got a 2 x 4 about 2'-3' long and pushed the clutch
in with that and slid the seat up to hold it in place.
After I did this mod, I really noticed a big difference in the reaction time of the
clutch during a shift. This WILL NOT fix a slipping clutch! It
will simply allow it to engage a lot faster. My 16G stage III, ported everything,
2.5" DP and Cat, 3" cat back, FIPK, Fuel pump, Upper IC, BOV, 18PSI and some
other stuff that I probably forgot 2G FWD would not scratch third gear shifts, and now it
is soooo easy. Speed shifts into fourth used to be so bad that I could actually see the
clutch dust in the review mirror. Not any more. The only drawback is that now your drive
line, not your clutch, will be taking the abuse you intended for it in the first place.
Also, I can actually feel what the clutch is doing now. A little less refined, but a
lot more defined.
Thanks very much to Rudy
Vee and Mike
Stella for their contributions to this VFAQ - And to Club
DSM Canada for hosting it!